

Among the kitchen appliances with the extraordinary tendency to quickly transform into a complete mess involving food is the oven. There are the juicy drippings that have pooled at the bottom, a stray cookie that fell through the grill and has pretty much gone to solid carbon, and the thick layer of grease on its glass that has blocked you from seeing inside the oven for ages. Following a care guide for your oven will be a big help!
Do you need help starting the oven-cleaning process? The pleasure of a spotlessly clean oven and the guarantee of better-tasting meals make the work worthwhile, even though it may feel daunting. Fortunately, cleaning an oven thoroughly isn’t as terrifying as you imagine. Here’s what you need to learn about cleaning an oven, from the straightforward push of the button to mixtures that dissolve grease.
How Frequent Should I Clean The Oven?
The cleaning schedule depends on how frequently you use your oven. As you regularly use it, more splatters will build up in the oven. A frequent baker should try to clean their oven every quarter thoroughly. Cleanings every six months or even once yearly can be effective for someone who doesn’t cook frequently.
If there is ever a lot of residue in the oven or something spills to the bottom during cooking, clean up the mess when the oven cools. Otherwise, the residue will continue to bake and smoke each time the oven is turned on. The primary oven maintenance cleaning advice is to clean up the inside at least once a month using a damp towel, warm water, and dishwashing liquid to prevent dirt buildup.
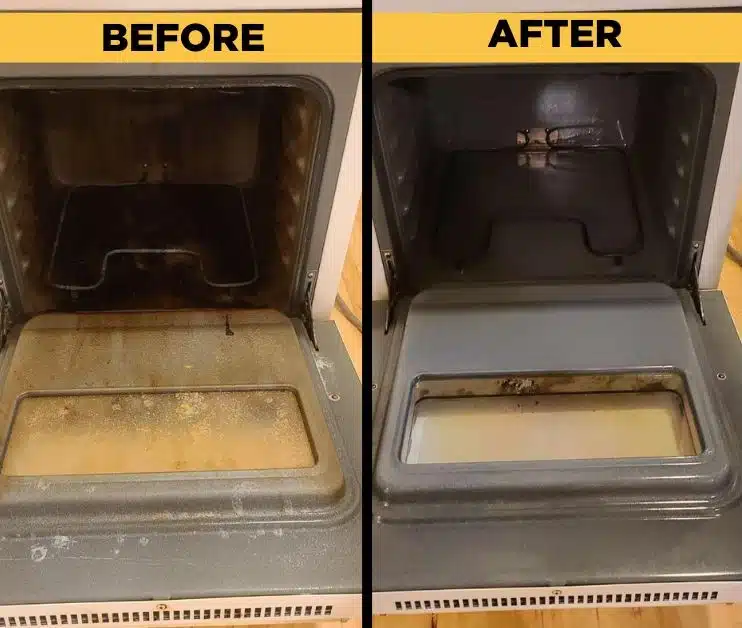
Why Is It Important To Clean The Oven?
Cleaning the oven ensures the good quality of the meals you prepare in it. The left behind grime and carbon affects the odor and taste of the food. Also, proper oven maintenance makes it work properly and last longer. Grease and carbon buildup make it considerably more difficult for an unclean oven to warm and hold its cooking temperature.
Care Guide for Your Oven
| Utilize Natural Products
Clean it with lemon

Step #1: Prepare a medium size oven-safe basin and fill it with clean water, then cut a fresh lemon in half and place them in the basin.
Step #2: Preheat the oven to 250 degrees.
Step #3: Place the basin inside the oven once it has warmed up and leave it there for an hour.
Step #4: Once done, open the oven door and allow it to cool for a bit.
Step #5: When it is slightly cool, wipe the interior with a sponge. For caked-on grime, you can use an abrasive tool to get rid of them.
Step #6: Grab a microfiber cloth and give the interior a final wipe.
Step #7: Get another microfiber cloth to wipe the exterior of the oven.
Clean it with vinegar and baking soda

Step #1: Remove all of the detachable components of the oven, such as the racks and thermometer.
Step #2: Place layers of newspapers on the floor under the oven.
Step #3: Make a baking soda paste in a small bowl.
Step #4: Spread the paste inside the oven. Make sure not to miss any area except for the electric components or where the gas is coming from.
Step #5: Close the oven door, then allow it to sit overnight for the best results.
Step #6: Place the racks in a big basin or in a bathtub and put baking soda and white vinegar on them.
Step #7: After the mixture produces foam, seal the tub and fill it with hot water. Leave it overnight.
Step #8: After you leave the oven and its parts overnight, wear hand gloves, then spray a sufficient amount of vinegar all over the interior to soften the baking soda. Utilize a damp cloth to wipe the interior of the oven. Use an abrasive tool to remove any tough buildups.
Step #9: Scrub the racks and other components with a microfiber cloth. Make sure to remove all the grime and grease.
Step #10: Let the racks air dry before placing them back in the oven.
Care Guide for Your Oven | Using Store-Bought Products

Step #1: Remove all of the detachable parts of the oven.
Step #2: Place layers of newspapers on the floor under the oven.
Step #3: Spray the cleaner all over the oven except for the heating elements and where the gas is coming from.
Step #4: Close the oven door and leave the cleaner for 30 minutes to do its job.
Step #5: While waiting, spray the cleaner on the racks as well, then place them inside a plastic bag. Leave it for 30 minutes.
Step #6: After 30 minutes, wipe the interior of the oven with a damp cloth. Use an abrasive tool to remove any tough buildups.
Step #7: Grab a clean cloth and give the interior of the oven a final wipe.
Step #8: Clean the exterior part as well with the cleaner and microfiber cloth.
Step #9: Rinse the racks on the sink or tub. Scrub it with a cloth dipped in soapy water. Use any abrasive tool to get rid of tough buildups.
Step #10: Let the racks air dry before placing them back inside the oven.